 Save
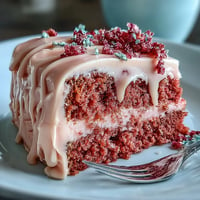
Save One spring morning, sunlight was warming the kitchen windowsill while a punnet of ripe strawberries filled the air with their perfume. With birds chirping outside, I decided to capture that fleeting moment by simmering up a pot of jam, not caring about perfection, just letting the sweetness bubble up. Sometimes, there's magic in something as everyday as swirling sugar and fruit together. The bright red mixture, spattering softly against the pot, felt like a quiet celebration of the season. This Cottagecore Strawberry Jam quickly became a favorite ritual, especially when I spread it on warm toast and watched the color bloom.
I made this jam in the company of a friend on a rainy afternoon, the two of us taking turns smashing strawberries between stories. We managed to get more sticky juice on our aprons than in the pot, laughing so hard we almost forgot to watch the bubbling jam. Later, we ladled it into jars and pressed squares of old fabric over the lids, instantly transforming our work into charming little gifts. That batch disappeared almost embarrassingly fast at breakfasts and afternoon teas. I still get texts every spring asking when the strawberry jam making will happen again.
Ingredients
- Fresh strawberries: Ripe, fragrant berries bring the jam's bright color and flavor – it’s worth handpicking a few for maximum taste.
- Granulated sugar: Sweetens and preserves, and I once learned the hard way that reducing it too much makes the jam weep.
- Freshly squeezed lemon juice: Lifts the flavor and balances sweetness; don’t skip it, even if you think it’s not necessary.
- Vanilla bean or vanilla extract (optional): Adds gentle floral notes – scraped beans feel fancy, but a teaspoon of good extract does wonders too.
Tired of Takeout? 🥡
Get 10 meals you can make faster than delivery arrives. Seriously.
One email. No spam. Unsubscribe anytime.
Instructions
- Prep the strawberries:
- Hull and halve the strawberries, then toss them into a big, heavy pot. Grab a potato masher and give them a few satisfying squashes, leaving some chunks for luscious texture.
- Combine and macerate:
- Sprinkle the sugar and drizzle the lemon juice over the fruit. Give it a good stir and let it sit for ten minutes, watching as glossy juices begin to collect.
- Add fragrant vanilla:
- If you're using vanilla bean, scrape out the seeds and stir them in along with the pod, or pour in vanilla extract now for a rounder sweetness.
- Simmer and stir:
- Bring everything to a soft, enthusiastic boil over medium heat, watching for the sugar crystals to melt away while stirring. Skim off any foam that puffs up, like you're polishing a little jewel.
- Cook until thick:
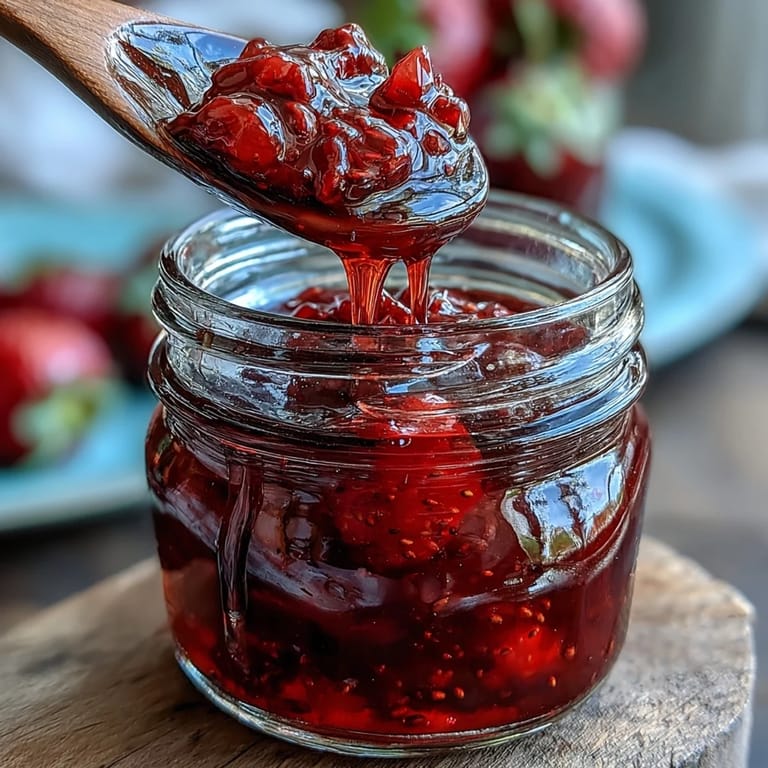
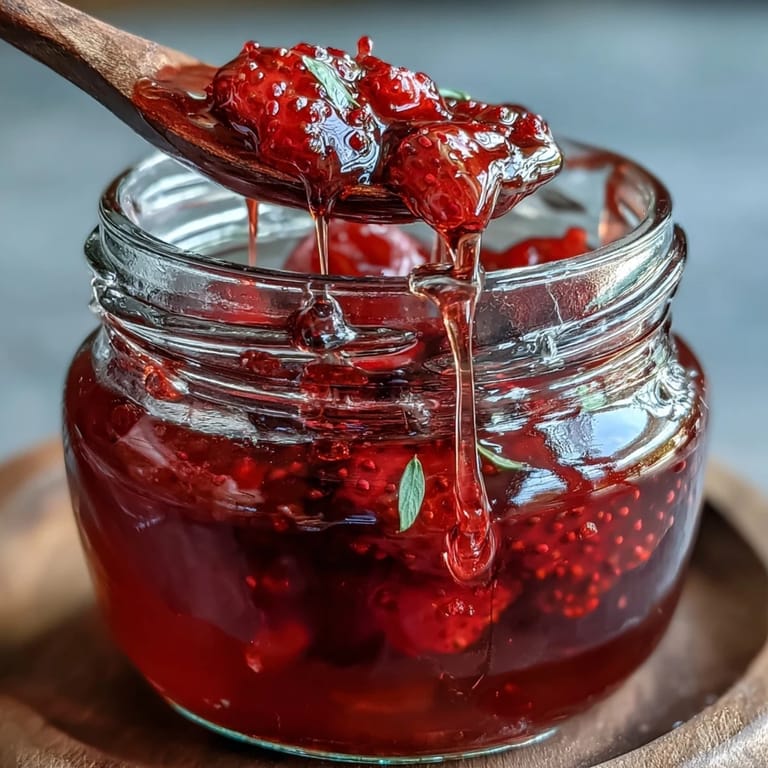
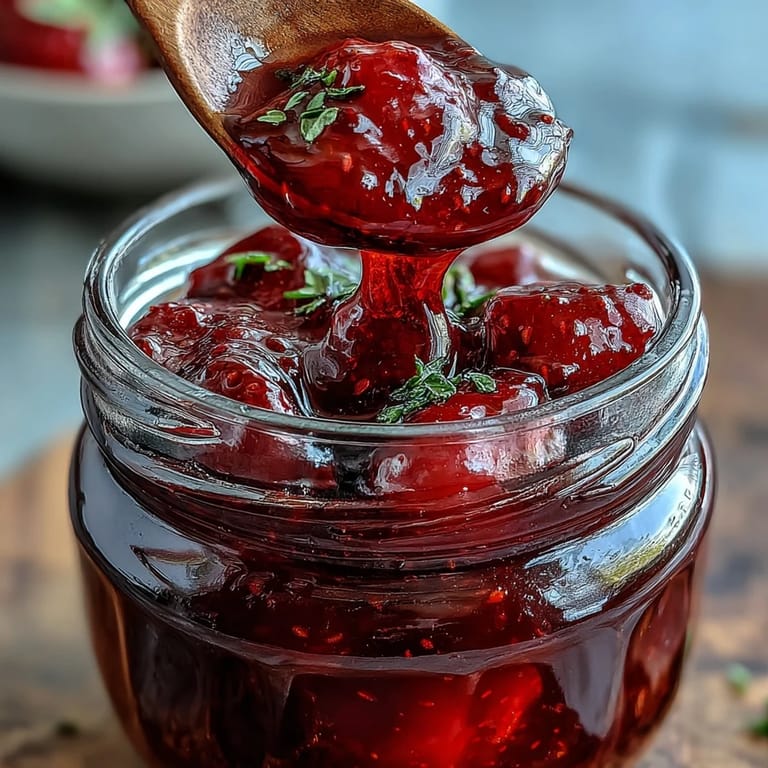
- Keep stirring and allow the jam to thicken, watching for it to reach 105°C (220°F) – or test doneness by nudging a cooled spoonful and looking for a gentle wrinkle.
- Finish and jar:
- Fish out the vanilla pod if used, then let the jam settle for five minutes before easing it into sterilized jars. Wipe any drips (sticky fingers are part of the fun), then seal immediately.
- Cool and store:
- Allow jars to cool on the counter until they're touchably warm, then move them to the fridge. Use within a month, or process jars in a water bath for longer keeping.
 Save
Save The first time I spooned this jam onto scones for a picnic, a light breeze flicked hair across my face and I realized how something homemade can make an ordinary day feel a bit enchanted. Each bite was tart, sweet, and shimmering in the sunlight, and in that small moment, it felt like spring was something you could truly taste.
Choosing and Preparing Your Jars
I love rummaging through thrift stores for mismatched glass jars – you never know what shape you’ll end up with, and it adds so much character to your pantry shelves. Decorating with scraps of cloth and twine is not just cute but makes any jar a lovely gift. Make sure the jars are scrupulously clean and sterilized; I pop them in a hot oven for extra peace of mind. Warm jars prevent breakage, especially when you’re ladling in hot jam. There’s something extra satisfying about hearing the gentle pop as the jars seal on cooling.
Getting the Jam to Set Perfectly
I used to stress about jam not thickening, but a candy thermometer took out the guesswork and let me relax a bit. That said, the chilled plate test has rescued me many times; nothing beats gently pushing the jam with your finger to see if it folds and wrinkles just so. If it looks too loose in the pan, remember it will thicken more as it cools. Adding a touch more lemon juice can rescue a batch that refuses to set. I always make a little extra room at the top of the jar for the jam to settle properly as it cools.
Subtly Changing the Flavor
Some days I have fun steeping a sprig of thyme or basil in the bubbling strawberries, letting herbal notes dance with the sweetness. If you like a gentler taste, swap half the vanilla for a splash of rosewater. Gifting? Slip a handwritten label with the date and tasting notes onto your jar for a personal touch.
- Wash your berries just before using so they stay at their freshest.
- Don’t worry if your jam has a few chunky bits – they give delightful texture.
- Always store open jars in the fridge to keep the flavor bright.
 Save
Save This jam is a celebration of spring on your spoon, and I hope it inspires fresh memories in your own kitchen. Something this cheerful deserves to be shared.
Recipe FAQ
- → How can I tell when the jam has set?
Use a candy thermometer and target 105°C (220°F). Alternatively, place a spoonful on a chilled plate—if it wrinkles when pushed, it has reached set. Keep in mind texture will firm slightly as it cools in jars.
- → Can I use frozen strawberries instead of fresh?
Yes. Thaw and drain excess liquid, then proceed. Frozen fruit may release more juice, so extend simmering time slightly to reach the correct thickness.
- → Is added pectin necessary for this method?
Not required. The combination of sugar, lemon juice and cooking concentrates natural pectin in the fruit. For a firmer set or shorter cooking, a small amount of commercial pectin can be added according to package instructions.
- → How should I sterilize jars and lids?
Wash jars and lids in hot soapy water, then submerge in simmering water for 10 minutes or heat in a 120°C oven for 10–15 minutes. Keep jars hot until filling to reduce contamination and cracking.
- → How can I adjust sweetness or flavor balance?
Reduce sugar slightly for a tarter finish, but expect a softer set. Increase lemon juice for brighter acidity or add vanilla for depth. Taste the cooked jam and adjust by briefly reheating if needed.
- → What are safe storage options and shelf life?
Seal jars while hot and store in a cool, dark place. Refrigerate after opening and use within one month. For long-term pantry storage, process sealed jars in a boiling water bath for 10 minutes.
- → Can I add herbs or other aromatics?
Yes—add a sprig of thyme or basil during cooking for subtle herbal notes, or scrape in vanilla bean for warmth. Remove any woody sprigs before jarring.