 Save
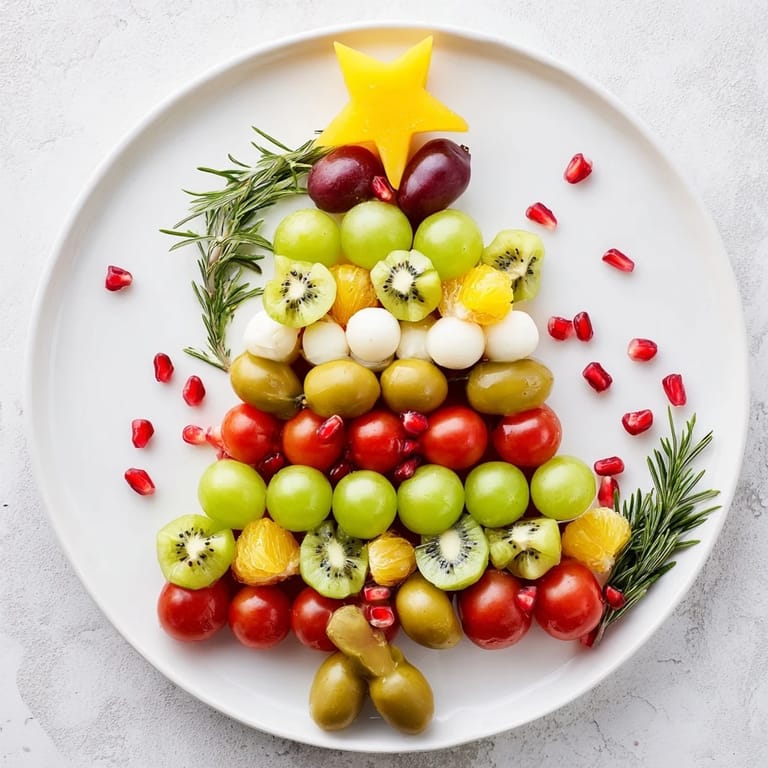
Save I'll never forget the year my sister called me three days before Christmas asking if I could bring something festive to our family gathering. With limited time and a kitchen full of produce, I had this sudden vision of arranging fruits and vegetables into a tree shape on a board. What started as a practical solution became the most talked-about dish of the evening—not because it was complicated, but because everyone felt the joy the moment they saw it.
The best part happened when my eight-year-old nephew grabbed a handful of pomegranate seeds and declared the whole board was 'the most beautiful thing he'd ever eaten.' That moment reminded me that food isn't just about taste—it's about creating memories that stick with people, especially during the holidays.
Ingredients
- Seedless green grapes (2 cups): These form your tree's body and provide that refreshing, juicy base. The trick is to wash and thoroughly dry them so they don't slip around when you're arranging—moisture is the enemy of a neat presentation
- Green olives, pitted (2 cups): Beyond just flavor, these add textural contrast and a gorgeous earthy green tone. I learned to buy pitted ones because pitting them yourself takes forever and your fingers smell for days
- Kiwi slices (3 large kiwis): When you slice these rounds, they create beautiful circular patterns that catch the light. Peel them first, then slice—it's so much easier than trying to peel after slicing, trust me
- Cherry tomatoes, halved (1/2 cup): These are your ruby ornaments, bringing warmth and brightness to the design. Halving them instead of leaving whole gives you more surface area to work with when nestling them between other fruits
- Red grapes, halved (1/2 cup): The contrast between red and green is what makes this feel festive rather than just green. They also add little pops of color throughout, like scattered lights on a tree
- Mozzarella balls, bocconcini (1/2 cup): These tiny pearls are unexpected and delightful—they add a creamy, salty element that keeps people reaching back for more. Pat them dry with paper towels so they don't roll away when you're building
- Pomegranate seeds (1/4 cup): If you've never worked with pomegranates, buy them already seeded from the produce section. They're worth the premium because seeding them yourself is messy and takes forever, but those jewel-like seeds are absolutely worth it for the visual impact
- Yellow bell pepper stars (1 small pepper): A small cookie cutter transforms ordinary pepper slices into the perfect tree topper. Even without the cutter, strips of yellow pepper create that golden accent that feels intentional and festive
- Fresh rosemary sprigs: Beyond looking like pine needles, they smell incredible and actually taste good if someone wants to nibble on them. This is the detail that makes people think you spent hours on this
- Large wooden board or serving platter: The board itself is part of the presentation. Wooden looks warmest, but any large flat surface works. Triangular is ideal, but rectangular boards work beautifully too—just angle your arrangement to suggest the tree shape
- Crackers or sliced baguette (optional): Have these ready on the side. Some people want to build little bites with the fruit and bread, and honestly, it's a nice way to make the platter stretch further
Tired of Takeout? 🥡
Get 10 meals you can make faster than delivery arrives. Seriously.
One email. No spam. Unsubscribe anytime.
Instructions
- Start with your foundation:
- Lay out your wooden board where you'll actually be serving. Once this thing is built, you don't want to move it. Picture the tree in your mind—widest at the bottom, narrowing toward the top. Begin arranging green grapes, green olives, and kiwi slices in layers, starting at the base. Think of it like building blocks, alternating between types so you get a pattern. The key is starting wide and trusting that each layer gets smaller as you move up. Don't stress about perfection; nature isn't perfectly symmetrical, and neither should your tree.
- Tuck in the greenery:
- As you're building those layers, slide fresh rosemary sprigs between the fruits and vegetables. This isn't just decoration—it fills gaps, adds that pine forest feeling, and gives the whole thing an intentional, designed look. The sprigs should peek out like little evergreen branches. If you have extra rosemary, lay a few around the base like a forest floor.
- Add your ornaments:
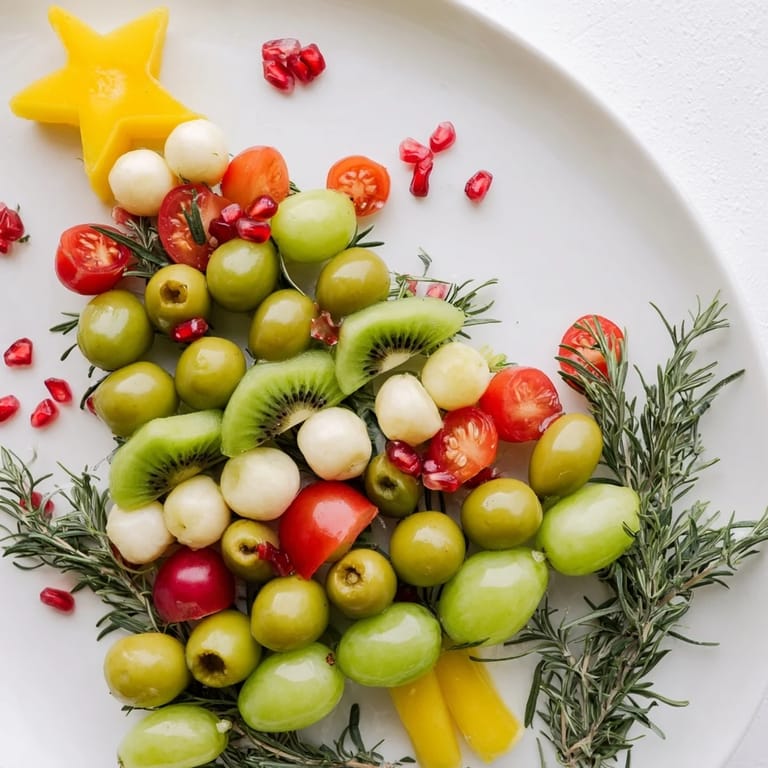
- Now comes the fun part. Scatter your colorful toppings across the tree like you're hanging ornaments—cherry tomato halves, red grape halves, mozzarella balls, and pomegranate seeds. Don't overthink placement. The beauty is in the randomness of the colors dotting the green base. Step back and look at it. Does it feel balanced? Are there spots of green showing through? That's actually good. Perfect coverage can look flat and planned.
- Crown your tree:
- Place your yellow bell pepper stars at the very top first—this is your tree topper, the star that pulls everything together. If you have extra stars, scatter a few down the sides of the tree like extra decorations. This is where a small cookie cutter really earns its place, but even rough star shapes cut with a knife look charming and handmade.
- Final moment before serving:
- Step back and really look at your creation. Does it sparkle with color? Can you see hints of red, gold, white, and green? If there's a spot that feels too monotone, add one more piece of something vibrant. Then take a photo if you want to, because people always do, and then let it sit out immediately before serving. Fresh fruit is best enjoyed right away, when everything is still at its crispest.
 Save
Save What I didn't expect was that this board would become our family's new tradition. Now, every year, someone asks, 'Are we doing the Christmas tree board?' It's become less about the specific fruits and more about that moment when everyone gathers around something beautiful that we made together. That's when I knew food could be so much more than nutrition—it could be the thing that ties a family together.
Building Your Own Vision
Here's what makes this recipe so forgiving: there's no wrong way to build it. One year I didn't have kiwis, so I used thin apple slices and added a few green apple chunks for crunch. Another time, a friend made it with layers of thinly sliced cucumber and avocado. The structure is what matters—that tree shape, that progression from wide to narrow. The specific fruits and vegetables? That's where your own preferences and what's in your kitchen come into play. I've learned that the most memorable versions of recipes are the ones people make their own.
Make-Ahead Magic
Unlike hot appetizers that demand perfect timing, this board actually gets better with an hour or two of refrigerator time. The flavors mingle slightly, everything gets chilled, and the presentation stays fresh. You can prep all the components the night before—have containers with your cut fruits and veggies ready to go. Then, the morning of your gathering, you just arrange. It's the kind of recipe that lets you enjoy your party instead of spending the last hour before guests arrive stressed in the kitchen.
When Substitutions Become Creations
The beauty of this board is how it invites personalization. For a vegan version, skip the mozzarella and add roasted chickpeas or white beans for that little creamy element. Missing red grapes? Use strawberries or cranberries. No kiwis? Thin apple or pear slices work beautifully. I once added thinly sliced radishes for a peppery surprise and some edible flowers for a truly elegant moment. The trick is thinking about color and texture balance—you want the eye to travel across bright spots and interesting shapes. Every addition should make someone say, 'Oh, I see why that's there.'
- Try adding cucumber slices or green apple wedges for more texture and crunch variety
- Use any additional colorful veggies like radishes, yellow cherry tomatoes, or even bell pepper rings to create unique ornament shapes
- Consider adding edible flowers or microgreens for an elegant, garden-fresh touch that elevates the presentation
 Save
Save Making this board is one of those rare kitchen moments that feels like both an accomplishment and a gift you're giving to people you care about. Serve it with confidence and watch what happens when something both beautiful and delicious arrives at the table.
Recipe FAQ
- → How do I create the triangular shape?
Arrange green grapes, green olives, and kiwi slices in alternating layers, starting with the widest layer at the base, working upward to form a triangle.
- → What can substitute mozzarella balls for a vegan option?
Use vegan cheese balls or omit the mozzarella entirely while keeping the other colorful toppings for texture and flavor.
- → How can I keep the fruit fresh and prevent sogginess?
Dry grapes and kiwi slices thoroughly before arranging, and serve immediately to maintain freshness and texture.
- → What beverages pair well with this platter?
Pair with crisp white wines like Sauvignon Blanc or sparkling water with a hint of lime for refreshing balance.
- → Can I add other toppings for extra texture?
Yes, consider adding cucumber slices, green apple wedges, radishes, or yellow cherry tomatoes for additional color and crunch.